

Share :
How to Choose the Right Laboratory Bottle for Your Application
Updated On 07/17/2026

By Donal O’Sullivan, BSc. Reviewed by Michael Anderson, MBA.
To choose the right laboratory bottle, start with the application: what the bottle will contain, how it will be filled or poured, whether the contents are light-sensitive, whether sterility or autoclaving matters, and whether the same specification will need to be reordered. Then select the material, volume, mouth style, cap/thread and closure system that match the workflow.
For most laboratory applications, the correct bottle is not defined by material or size alone. A 500 ml bottle, for example, may still be unsuitable if the material, cap, sterility status or mouth style does not match the sample, reagent or storage conditions.
If you are still defining the requirement, start with LabFriend UK’s laboratory vessels category, then narrow the choice by application, material, bottle format, volume and closure.
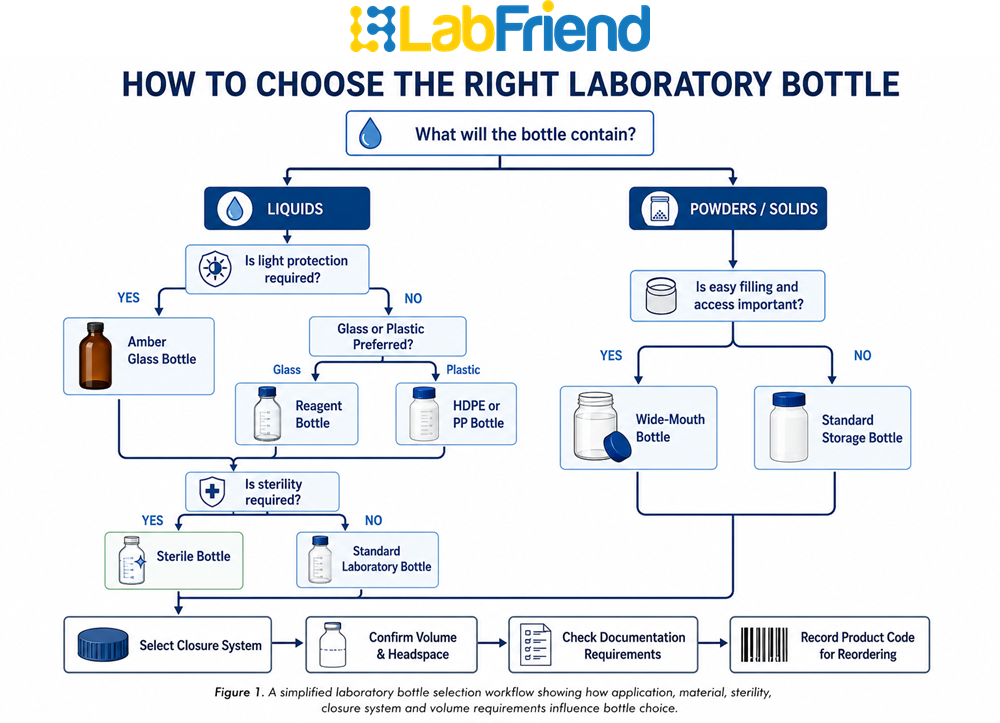
Why laboratory bottle selection matters
Laboratory bottles are used in routine workflows every day: storing reagents, preparing solutions, transporting samples, organising stock, holding powders or solids, supporting sterile handling and managing repeat supply.
Because bottles are familiar consumables, they are sometimes selected too quickly. That can create issues such as:
- poor chemical or sample compatibility
- awkward filling, pouring or cleaning
- wrong bottle mouth style
- unsuitable cap or closure
- light exposure for sensitive contents
- incorrect assumptions about sterility or autoclavability
- stockroom duplication
- repeat-order errors
- uncontrolled substitutions
For scientists and researchers, the bottle is part of the workflow. It should be selected as a complete container system: bottle body, cap, liner, thread, material, volume and intended use.
Five-step laboratory bottle selection framework
Use this framework before choosing a bottle.
|
Step |
Question to ask |
Why it matters |
|
1 |
What will the bottle contain? |
The substance or sample drives material, compatibility and documentation needs |
|
2 |
How will the bottle be used? |
Filling, pouring, transport, storage and cleaning affect bottle format |
|
3 |
What material is suitable? |
Glass and plastics behave differently and must be checked against the workflow |
|
4 |
What closure system is required? |
Cap, thread, liner and seal compatibility affect leakage, evaporation and handling |
|
5 |
Will this bottle be reordered? |
Recording the exact specification supports repeat purchasing and avoids substitutions |
Direct answer: choose the bottle by workflow first, then material, format, closure and repeat-order requirement.
1. Start with the application
The first question is not “glass or plastic?” or “what size?” It is:
What will this bottle do in the lab?
Common laboratory bottle applications include:
- reagent storage
- prepared solution storage
- sample collection
- sample transport
- powder or solid storage
- sterile sampling
- liquid dispensing
- wash bottle use
- cold storage
- trace analysis
- teaching laboratory workflows
- stockroom or fridge organisation
Each application creates different requirements.
For example, a bottle used for routine liquid storage may need controlled pouring, while a bottle used for powders or solids may need a wider opening. A bottle used for light-sensitive contents may require amber glass or another appropriate light-protective format. A bottle used in a sterile workflow may need documented sterility rather than simply a clean-looking container.
2. Choose the right bottle type
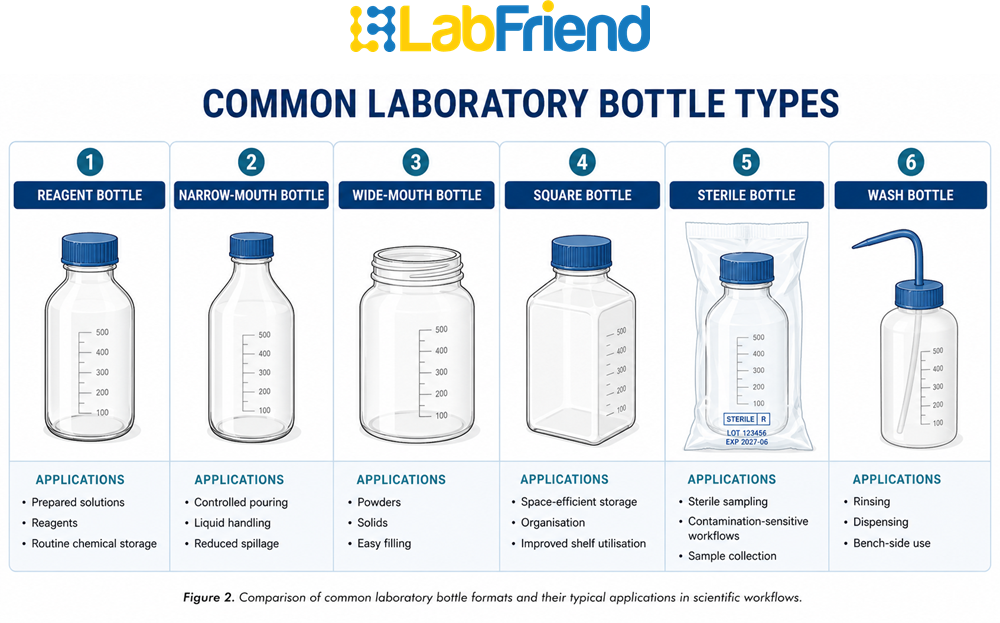
Different laboratory bottle types solve different handling problems.
|
Bottle type |
Commonly used for |
Key selection point |
|
Reagent bottle |
Reagents, prepared solutions, routine chemical storage |
Material, volume, cap/thread and clear or amber format |
|
Narrow-mouth bottle |
Liquids and controlled pouring |
Reduces spillage risk and supports routine liquid handling |
|
Wide-mouth bottle |
Powders, solids, samples or easier filling |
Easier filling, removal and cleaning |
|
Square bottle |
Space-efficient storage |
Useful for cupboards, benches, fridges and stockrooms |
|
Sterile bottle or bag |
Sterile or contamination-sensitive workflows |
Sterility status and packaging must be confirmed |
|
Wash bottle |
Rinsing, dispensing and bench-side liquid handling |
Material, nozzle, labelling and liquid compatibility |
Choosing reagent bottles
Reagent bottles are commonly selected for prepared solutions, reagents and routine chemical storage. Important checks include material, volume, cap/thread, clear or amber format, labelling area and closure suitability. For a deeper insight see our article How to Select Laboratory Reagent Bottles for Chemical Storage
If your application involves prepared solutions, routine reagents or chemical storage, compare LabFriend UK’s laboratory reagent bottles by material, volume, cap/thread and clear or amber format before requesting a quote.
Choosing narrow-mouth bottles
Narrow-mouth bottles are commonly used where controlled pouring is important. They are often practical for routine liquid storage and transfer where a smaller opening helps reduce spillage.
For routine liquid workflows, view LabFriend UK’s narrow-mouth laboratory bottles and compare options by material, volume and closure.
Choosing wide-mouth bottles
Wide-mouth bottles are useful where the lab needs easier filling, emptying, cleaning or access. They are often selected for powders, solids, samples or viscous materials where a narrow opening would be impractical.
For powders, solids, samples or workflows where filling access matters, browse LabFriend UK’s wide-mouth laboratory bottles and confirm material, closure and volume before ordering.
Choosing square bottles
Square bottles can help where storage density, labelling visibility and organisation matter. They may be useful in stockrooms, fridges, cupboards and bench storage where round bottles use space less efficiently.
If storage efficiency matters in cupboards, fridges or stockrooms, compare LabFriend UK’s square laboratory bottles as part of your bottle selection process.
Choosing sterile bottles and bags
Sterile bottles and bags should be selected by sterility status, packaging format, volume, closure and workflow requirement. Sterility should not be assumed to imply DNase-free, RNase-free, endotoxin-controlled or other purity specifications unless supported by manufacturer documentation.
If sterility or contamination-sensitive handling is required, review LabFriend UK’s sterile bottles and bags and confirm sterility status, packaging format and product specification before ordering.
3. Choose the right material
Bottle material should be selected according to the stored substance or sample, compatibility requirements, visibility, temperature conditions, light sensitivity, handling risk and workflow.
Common laboratory bottle materials include:
|
Material |
Common selection use |
What to check |
|
Borosilicate glass |
Reagent storage, prepared solutions, visible liquid storage |
Compatibility, thermal shock limitations, breakage risk, temperature suitability and closure |
|
Amber glass |
Light-sensitive contents where reduced light exposure is required |
Whether amber protection is sufficient for the substance and method |
|
HDPE |
Routine plastic storage, sample handling and transport where suitable |
Chemical compatibility, temperature, storage duration and cap compatibility |
|
LDPE |
Flexible dispensing or wash bottle-style applications |
Solvent compatibility, permeability, nozzle/closure and labelling |
|
PP |
Laboratory plasticware and bottle formats where product specification supports use |
Temperature, autoclave suitability, compatibility and closure system |
Some organic solvents and oxidising agents may not be suitable for long-term storage in HDPE; compatibility should be confirmed against manufacturer chemical resistance data.
Although polypropylene is commonly used in autoclavable laboratory products, autoclavability remains product-specific and depends on the bottle design, closure system and manufacturer specification.
Glass is commonly selected where visibility, reagent storage or amber protection matter. Plastic is often selected where lower breakage risk, lighter handling or transport practicality matters.
However, material names alone are not enough. Compatibility depends on substance identity, concentration, temperature, exposure duration, storage conditions and manufacturer documentation.
Chemical compatibility charts should be treated as guidance rather than absolute proof of suitability, see our article Laboratory Bottle Materials Explained: Borosilicate Glass, Amber Glass, HDPE, LDPE and PP for more insights.
4. Select the correct mouth style
Bottle mouth style affects filling, pouring, emptying, cleaning and the risk of spillage.
|
Mouth style |
Usually better for |
Practical consideration |
|
Narrow-mouth |
Liquids and controlled pouring |
May be less suitable for powders or solids |
|
Wide-mouth |
Powders, solids, samples and easier filling |
May be less controlled for pouring liquids |
|
Square bottle format |
Storage organisation |
Check dimensions, storage location and handling |
The mouth style should match the workflow, not simply the volume. A bottle may have the right capacity but still be impractical if the opening is wrong.
For controlled pouring and routine liquids, use LabFriend UK’s narrow-mouth laboratory bottles. For powders, solids, samples or easier filling, use wide-mouth laboratory bottles as the more practical starting point.
5. Check the cap, thread and closure system
A bottle should be assessed as a complete container system. The bottle body may be suitable while the cap, liner, seal or thread is not.
Before ordering, check:
- thread type
- cap material
- liner or seal material
- closure integrity
- pouring ring or accessory compatibility
- whether the cap is suitable for the stored substance
- whether the cap is suitable for autoclaving, where required
- whether replacement caps are available
- whether the bottle and cap are supplied together or separately
GL thread compatibility (for example GL45 and other DIN-standard laboratory thread formats where relevant) should be checked carefully. Do not assume that caps are interchangeable just because they look similar.
6. Consider volume and headspace
Volume selection affects usability, handling, storage, headspace and reorder control.
Headspace may also be required to accommodate thermal expansion, mixing, agitation or other process requirements depending on the stored material.
When choosing volume, consider:
- working volume
- fill volume
- headspace requirements
- storage duration
- manual handling
- bench or fridge space
- pack size
- how often the bottle will be reordered
- whether the lab should standardise on fewer common sizes
A larger bottle may reduce reorder frequency but increase handling difficulty or storage space. A smaller bottle may be easier to handle but require more frequent reordering.
7. Check sterility, autoclavability and documentation
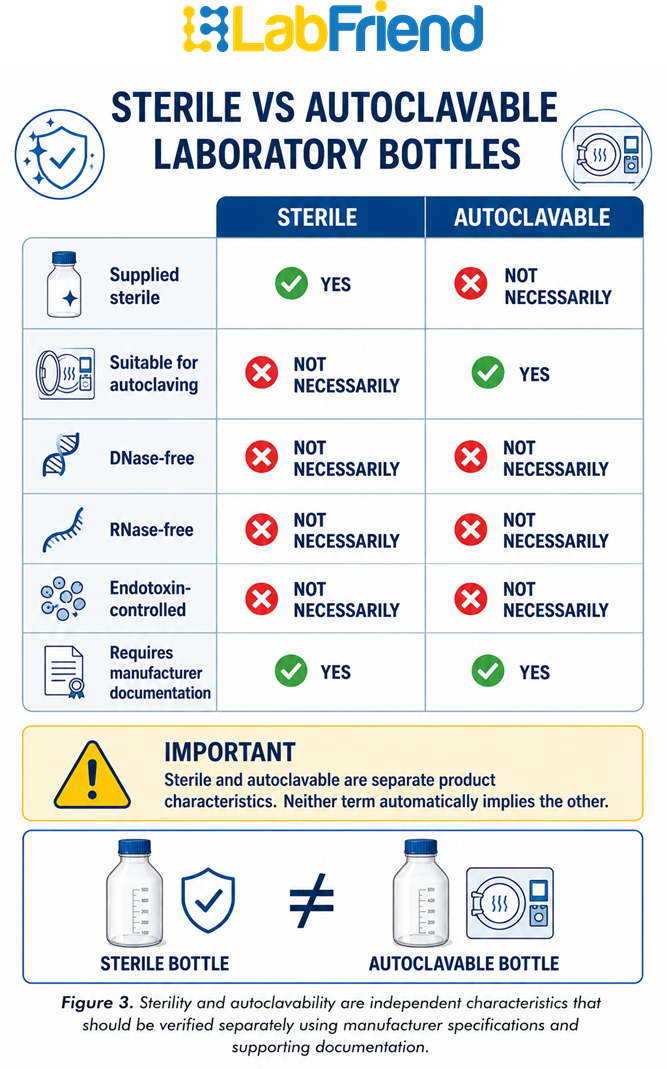
Sterility, autoclavability and documentation are separate requirements. They should not be assumed from the bottle material or appearance.
|
Requirement |
What to check |
|
Sterile |
Product is supplied sterile where specified |
|
Autoclavable |
Bottle and closure system are specified for autoclaving |
|
DNase/RNase-free |
Manufacturer documentation confirms required purity status |
|
Endotoxin-controlled |
Documentation supports the claim |
|
Certified/pre-cleaned |
Certificate or cleanliness specification matches the workflow |
|
Trace analysis suitability |
Container meets method or contamination-control requirements |
Sterile does not automatically mean autoclavable. Autoclavable does not automatically mean sterile. A material commonly used in laboratories does not automatically confirm suitability for every workflow.
Autoclaving may also affect labels, graduations, closure materials or seals, even where the bottle body itself is suitable.
For contamination-sensitive workflows, use LabFriend UK’s sterile bottles and bags as a product discovery route, then confirm the specification before ordering.
Application-based laboratory bottle selection guide
|
Application |
Bottle type to consider |
Material considerations |
Commercial route |
|
Routine reagent storage |
Reagent bottle |
Borosilicate glass, amber glass or suitable plastic |
|
|
Liquid storage and controlled pouring |
Narrow-mouth bottle |
Glass or compatible plastic |
|
|
Powders, solids or easier filling |
Wide-mouth bottle |
Glass or compatible plastic |
|
|
Space-efficient storage |
Square bottle |
Material depends on contents and storage conditions |
|
|
Sterile or contamination-sensitive workflows |
Sterile bottle or sterile bag |
Confirm sterility and documentation |
|
|
Broad bottle or vessel selection |
Laboratory vessel |
Narrow by application, material and closure |
Use this table as a routing guide, not as a substitute for checking manufacturer specifications and laboratory procedures.
What this guide does not solve
This guide helps narrow the selection, but it does not replace technical documentation or laboratory validation.
Choosing a laboratory bottle type does not automatically confirm:
- chemical compatibility
- sample compatibility
- cap or closure suitability
- sterility
- DNase-free status
- RNase-free status
- endotoxin status
- autoclave suitability
- temperature suitability
- pressure or vacuum suitability
- regulatory suitability
- method suitability
Standard laboratory bottles are not necessarily designed for pressure or vacuum service. Where pressure differentials may occur, the manufacturer specification should be reviewed before use.
Procurement efficiency is useful, but technical suitability should always come first.
What to check before purchasing laboratory bottles
Before placing an order, check:
|
Check |
Why it matters |
|
Application |
Defines the bottle’s role in the workflow |
|
Material |
Affects compatibility, visibility, breakage risk and handling |
|
Volume |
Affects storage, headspace and reorder planning |
|
Mouth style |
Affects filling, pouring, emptying and cleaning |
|
Cap/thread |
Prevents closure mismatch |
|
Liner/seal |
May affect leakage, evaporation or compatibility |
|
Clear or amber format |
Important for visibility or light exposure |
|
Sterility status |
Must be confirmed where required |
|
Autoclavability |
Product-specific; never assume |
|
Documentation |
Important for QA, trace or contamination-sensitive workflows |
|
Product code |
Supports accurate repeat ordering |
If you are still comparing options, use LabFriend UK’s laboratory vessels as the broad starting point. If the application is already reagent-focused, move directly to laboratory reagent bottles.
Common mistakes when choosing laboratory bottles
- Choosing by volume only
A bottle’s volume does not define whether it is suitable. Material, closure, mouth style and workflow matter just as much.
- Treating glass and plastic as simple alternatives
Glass and plastic bottles solve different problems. The right choice depends on compatibility, handling, visibility, breakage risk and application.
- Ignoring the cap or closure
The cap, liner and thread are part of the container system. A suitable bottle body with the wrong closure can still create problems.
- Confusing sterile and autoclavable
Sterile and autoclavable are separate characteristics. They must be checked independently.
- Using amber glass without checking the required light protection
Amber glass can reduce light exposure where suitable, but it does not automatically solve every light-sensitivity requirement.
Amber glass can reduce exposure to ultraviolet and some visible wavelengths, but the required level of light protection should be validated for the specific substance and method.
- Assuming bottle graduations are accurate measuring tools
Graduations on laboratory bottles are typically useful for approximate volume indication. Use appropriate volumetric equipment where accurate measurement is required.
- Reusing bottles without checking contamination risk
Reuse may be suitable in some workflows, but it may be inappropriate for sterile, trace, biological or method-sensitive applications.
- Failing to record repeat-order details
Once a suitable bottle has been selected, record the material, volume, cap/thread, pack size and product code to support future reordering.
UK laboratory purchasing considerations
Scientists and researchers often define the technical requirement, even when a lab manager or procurement team places the order. A clear specification helps prevent delays and unsuitable substitutions.
A good bottle request should include:
- application
- material
- volume
- mouth style
- cap/thread type
- clear or amber format
- sterile or non-sterile requirement
- autoclavability requirement, if relevant
- documentation requirement
- pack size
- preferred product code
- whether alternatives can be considered
This is especially important for UK laboratories with recurring consumables demand, such as CROs, independent testing laboratories, SME biotech companies and university research groups. A clear specification helps turn a one-off purchase into a repeatable, controlled ordering process.
Relevant LabFriend category pathways
Use the application to route the selection:
- For broad bottle and vessel selection, start with LabFriend UK’s laboratory vessels.
- For prepared solutions, reagents or routine chemical storage, compare laboratory reagent bottles.
- For controlled pouring and routine liquids, review narrow-mouth laboratory bottles.
- For powders, solids, samples or easier filling, browse wide-mouth laboratory bottles.
- For space-efficient storage, compare square laboratory bottles.
- For sterile or contamination-sensitive handling, review sterile bottles and bags.
FAQs
How do I choose the right laboratory bottle?
Start with the application, then define the material, volume, mouth style, cap/thread, sterility or autoclavability requirement and repeat-order need. The correct bottle should match the workflow, not just the preferred material or size.
What type of laboratory bottle should I use for reagent storage?
Reagent storage commonly requires a bottle selected by material, volume, cap/thread, closure compatibility and clear or amber format. The stored substance and laboratory procedure should guide the final choice.
Should I use glass or plastic laboratory bottles?
Use glass where visibility, reagent storage, amber protection or reusable storage are important and compatibility is confirmed. Use plastic where reduced breakage risk, lighter handling or transport practicality matter and compatibility is confirmed.
When should I use narrow-mouth laboratory bottles?
Narrow-mouth bottles are commonly used for liquids and controlled pouring. They may be less practical for powders, solids or workflows requiring easy access.
When should I use wide-mouth laboratory bottles?
Wide-mouth bottles are commonly used for powders, solids, samples, easier filling and easier cleaning. They may be less controlled for pouring liquids.
Are sterile and autoclavable laboratory bottles the same?
No. Sterile bottles are supplied sterile where specified. Autoclavable bottles are suitable for autoclaving only where the product documentation confirms this. One characteristic does not automatically imply the other.
What should I check before buying laboratory bottles?
Check application, material, volume, mouth style, cap/thread, closure system, clear or amber format, sterility, autoclavability, documentation and repeat-order code.
Can I use bottle graduations for accurate measuring?
Bottle graduations are generally useful for approximate volume indication only. Use appropriate volumetric equipment where accurate measurement is required.
What cap or closure should I choose for laboratory bottles?
Choose the cap and closure based on thread compatibility, cap material, liner or seal suitability, leakage risk, stored substance and any temperature or autoclave requirements.
How can I make repeat ordering easier?
Record the product code, material, volume, mouth style, cap/thread, pack size and approved alternatives. This helps prevent uncontrolled substitutions and repeated product searches.
Written by: Donal O’Sullivan, BSc, Co-Founder and Sales Director, LabFriend UK. Donal brings deep chemistry-led technical expertise across analytical chemistry, biochemistry, environmental monitoring, laboratory instrumentation, consumables and scientific product selection.
Reviewed by: Michael Anderson, MBA, Founder and Managing Director, LabFriend UK. Michael reviews LabFriend UK content for customer relevance, commercial accuracy, operational practicality and alignment with LabFriend UK’s laboratory supply model.
Conclusion
Choosing the right laboratory bottle starts with the application. The bottle should be selected according to what it will contain, how it will be used, what material is suitable, which closure system is required and whether the same specification needs to be reordered.
For scientists and researchers, the key is to treat the bottle as part of the workflow rather than a generic container. Material, volume, mouth style, cap, sterility, autoclavability and documentation all matter.
Once the correct bottle is identified, record the specification so the same item can be ordered consistently in future.
If you would like some help with bottle / vessel or any other consumable sourcing please do give us a call on +44 (0)20 33554467 or complete contact us form on our site and we will get back to you promptly
Further Reading:
Laboratory Bottle Selection for Lab Managers: Standardising Everyday Storage and Handling
Related Stories

Laboratory Bottle Selection for Lab Managers - Standardising Everyday Storage and Handling
Learn how UK lab managers can standardise laboratory bottle selection by material, volume, mouth style, closure, sterility, compatibility and reorder requirements to reduce stockouts and simplify repeat purchasing.

Glass vs Plastic Laboratory Bottles - Which Should UK Labs Choose
Glass vs Plastic Laboratory Bottles - Which Should UK Labs Choose

Laboratory Bottle Materials Explained - Borosilicate Glass - Amber Glass - HDPE - LDPE and PP
Laboratory Bottle Materials Explained - Borosilicate Glass - Amber Glass - HDPE - LDPE and PP

How to Select Laboratory Reagent Bottles for Chemical Storage
How to Select Laboratory Reagent Bottles for Chemical Storage