

Share :
How to Select Laboratory Reagent Bottles for Chemical Storage
Updated On 07/17/2026

By Donal O’Sullivan, BSc. Reviewed by Michael Anderson, MBA.
|
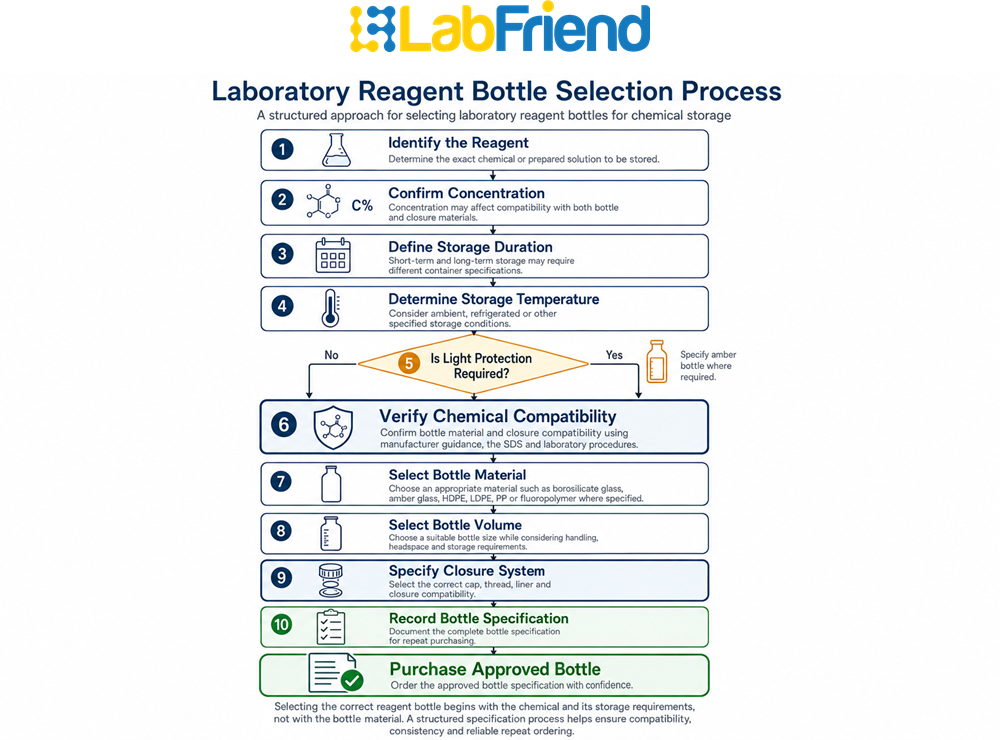
To select a laboratory reagent bottle for chemical storage, start with the reagent rather than the bottle. The stored chemical, concentration, storage duration, temperature, light sensitivity, closure requirement and laboratory procedure should determine the bottle material, volume, cap, liner, thread type and clear or amber format. For QA/QC laboratories, reagent bottle selection should be treated as a controlled specification decision. A bottle that looks suitable may still be wrong if the closure is incompatible, the material is unsuitable for the reagent, the volume creates poor headspace control, or the bottle cannot be reordered consistently. For broader bottle selection guidance, read LabFriend UK’s Laboratory Bottles: Selection Guide for UK Laboratories. Once the reagent, storage conditions and closure requirements are understood, compare LabFriend UK’s laboratory reagent bottles by material, volume, cap/thread and clear or amber format.
|
Why reagent bottle selection matters in QA/QC laboratories
In a QA/QC laboratory, reagent bottles are not just storage containers. They are part of the control system that protects the identity, condition and usability of reagents used in testing, analysis, preparation and routine laboratory work.
A poor reagent bottle choice can create avoidable problems. The reagent may be stored in a material that is unsuitable for the chemical or concentration. A cap or liner may be overlooked even when the bottle body appears acceptable. A clear bottle may be used where light exposure should have been considered. A bottle may be difficult to pour from, awkward to label, too large for safe handling, or impossible to reorder consistently because the original specification was not recorded.
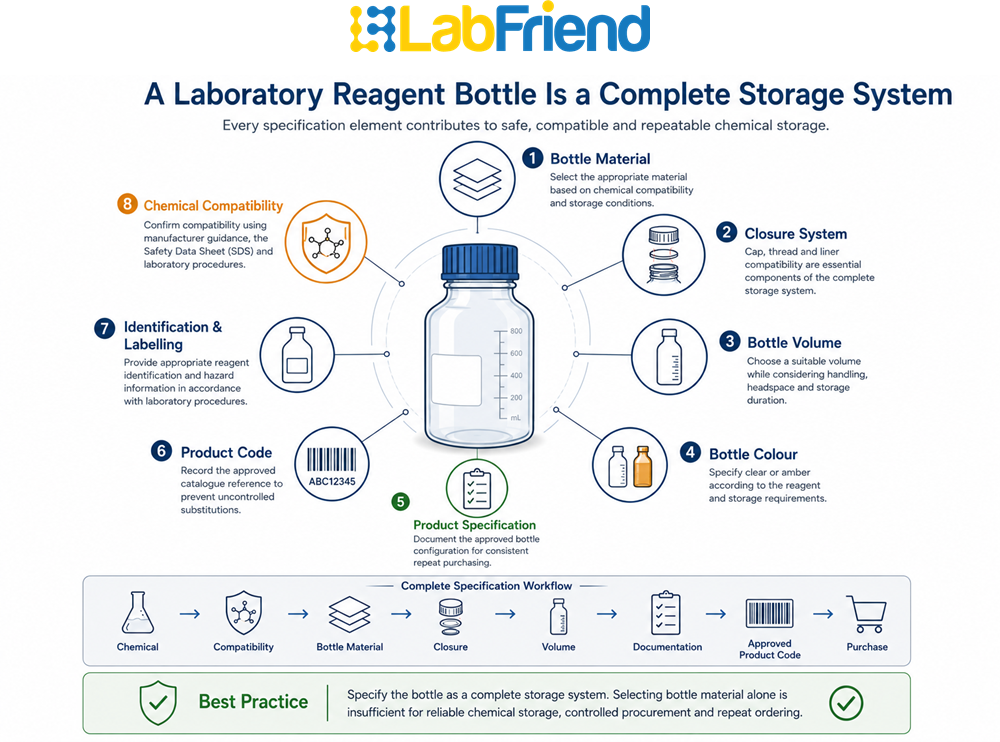
These issues matter because QA/QC workflows depend on repeatability. Even where the bottle itself is a low-cost consumable, a wrong bottle can create disruption, waste, delays or uncertainty. The safest commercial and technical approach is to define the reagent bottle as a complete storage system: bottle body, material, volume, cap, liner, thread, colour, label area, documentation and reorder code.
For this reason, reagent bottle selection should not begin with a generic question such as “Do we need a glass bottle or a plastic bottle?” It should begin with the chemical storage requirement.
Start with the reagent, not the bottle
The most important selection question is: what exactly will the bottle contain?
A reagent bottle may be used for prepared solutions, acids, bases, buffers, solvents, standards, stains, indicators, cleaning solutions or routine laboratory chemicals. Each of these use cases can create different requirements for material compatibility, closure selection, light protection, labelling and storage conditions.
A QA/QC Manager should first confirm the reagent identity, concentration and intended storage duration. A dilute aqueous solution stored for a short period may have different requirements from a concentrated chemical stored long term. A light-sensitive reagent may require different handling from a routine buffer. A volatile or odorous substance may raise closure and seal questions. A method-locked workflow may require a specific bottle type, certificate, cleanliness status or documented container specification.
The bottle material is only one part of this decision. Suitability depends on the reagent, concentration, temperature, exposure duration, storage environment and manufacturer compatibility data. Where hazardous or reactive chemicals are involved, the bottle choice should also be checked against the SDS, COSHH assessment and local laboratory procedures.
A practical way to control this is to write the reagent storage requirement before choosing the bottle. That requirement should describe the reagent, concentration, storage temperature, expected duration, light sensitivity, closure requirement, volume and whether the bottle is part of a controlled method or routine laboratory stock.
Compatibility should normally be confirmed using the chemical manufacturer’s Safety Data Sheet (SDS), the bottle manufacturer’s published chemical resistance information, and the laboratory’s documented risk assessment before a bottle specification is approved.
Select the bottle material carefully
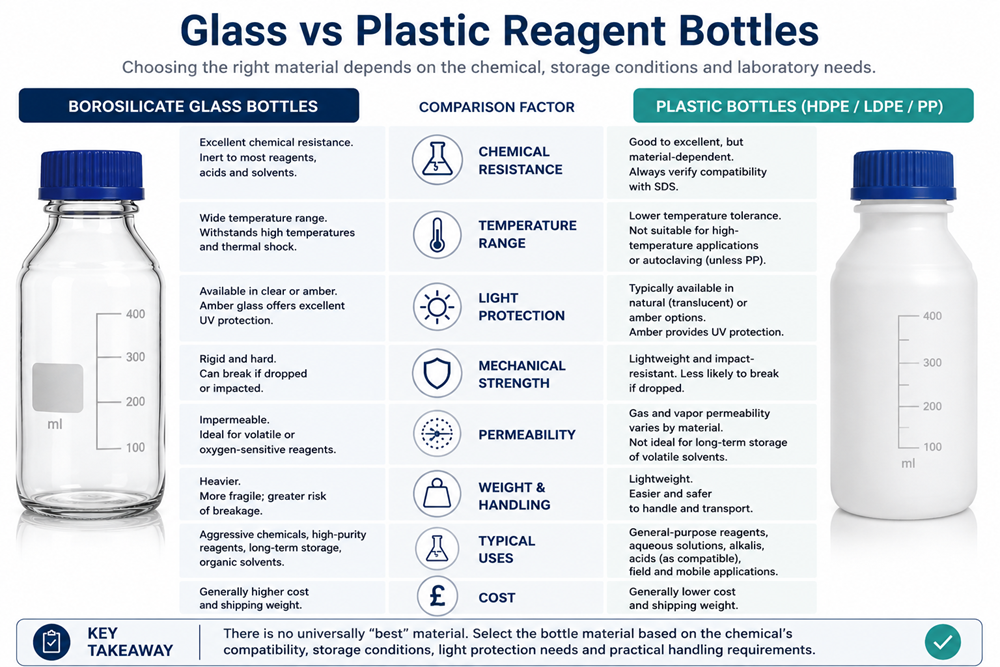
Reagent bottles are commonly available in glass and plastic formats, including borosilicate glass, amber glass and suitable plastic materials such as HDPE, LDPE or PP depending on the product. The right material depends on the reagent and workflow, not on a simple assumption that one material is always better.
Where compatibility information from different sources appears inconsistent, the bottle manufacturer’s published compatibility guidance should be used for the specific bottle material and closure system.
Borosilicate glass is commonly selected for many laboratory reagent storage applications because it provides excellent thermal shock resistance and broad chemical resistance to many laboratory reagents. However, it is not suitable for all chemicals. Hydrofluoric acid, concentrated phosphoric acid at elevated temperatures, and strong alkaline solutions during prolonged storage can attack glass. Compatibility should always be confirmed for the specific reagent and storage conditions.
Amber glass is often selected where reduced light exposure is required. It is commonly associated with light-sensitive reagents or prepared solutions, but amber glass does not automatically protect every substance under every condition. The required light protection depends on the reagent, method, storage duration and exposure conditions.
Amber glass primarily reduces transmission of ultraviolet and short-wavelength visible light but does not eliminate all light exposure. Storage requirements should follow the reagent manufacturer’s recommendations or validated laboratory procedures.
Plastic reagent bottles may be useful where lower breakage risk, lighter handling or practical storage matters. HDPE, LDPE and PP are not interchangeable, and none should be assumed suitable without checking compatibility. For some workflows, plastic can be the practical choice; for others, glass may be more appropriate. The deciding factor is the specification, not the material name alone.
Plastic compatibility depends not only on chemical resistance but also on permeability. Some organic solvents and volatile chemicals can permeate certain plastics even when no visible degradation occurs. Where evaporation, contamination or solvent loss are important, manufacturer compatibility data should be reviewed.
If the material decision is still broad, LabFriend UK’s laboratory vessels category can help compare wider storage bottle and vessel options before narrowing the requirement to reagent bottles. For more information see our guide Laboratory Bottle Materials Explained
Material selection overview
|
Material / format |
Common reagent bottle use |
What QA/QC should check |
|
Borosilicate glass |
Routine reagent storage, prepared solutions, visible liquid storage |
Reagent compatibility, cap/liner suitability, breakage risk and storage conditions |
|
Amber glass |
Light-sensitive reagents where reduced light exposure is required |
Whether amber protection is sufficient for the reagent and method |
|
HDPE |
Suitable plastic storage where lower breakage risk or lighter handling matters |
Chemical compatibility, storage duration, temperature and closure suitability |
|
LDPE |
Flexible dispensing or wash-bottle style workflows where suitable |
Solvent compatibility, dispensing closure and labelling control |
|
PP |
Laboratory plastic bottle formats where product specification supports use |
Chemical compatibility, temperature suitability and closure system |
|
Fluoropolymer (e.g. PTFE or FEP) |
Highly aggressive chemicals where specified |
Chemical compatibility, cost, application requirements and manufacturer recommendations |
This table should support the decision, not replace it. The final bottle choice should still be confirmed against the reagent, concentration, exposure time, storage conditions and product documentation.
Decide whether the bottle should be clear or amber
Clear and amber reagent bottles serve different practical purposes.
Clear reagent bottles make it easier to inspect contents, check fill level, identify visible precipitation or contamination, and manage routine bench or stockroom use. This visibility can be useful in many standard laboratory workflows.
Amber reagent bottles are commonly selected where reduced light exposure is required. They may be appropriate for light-sensitive reagents, indicators, stains or prepared solutions where the method or laboratory procedure calls for light protection. However, amber glass should not be used as a blanket solution. It reduces exposure to certain light conditions, but it does not automatically guarantee stability or suitability for every light-sensitive chemical.
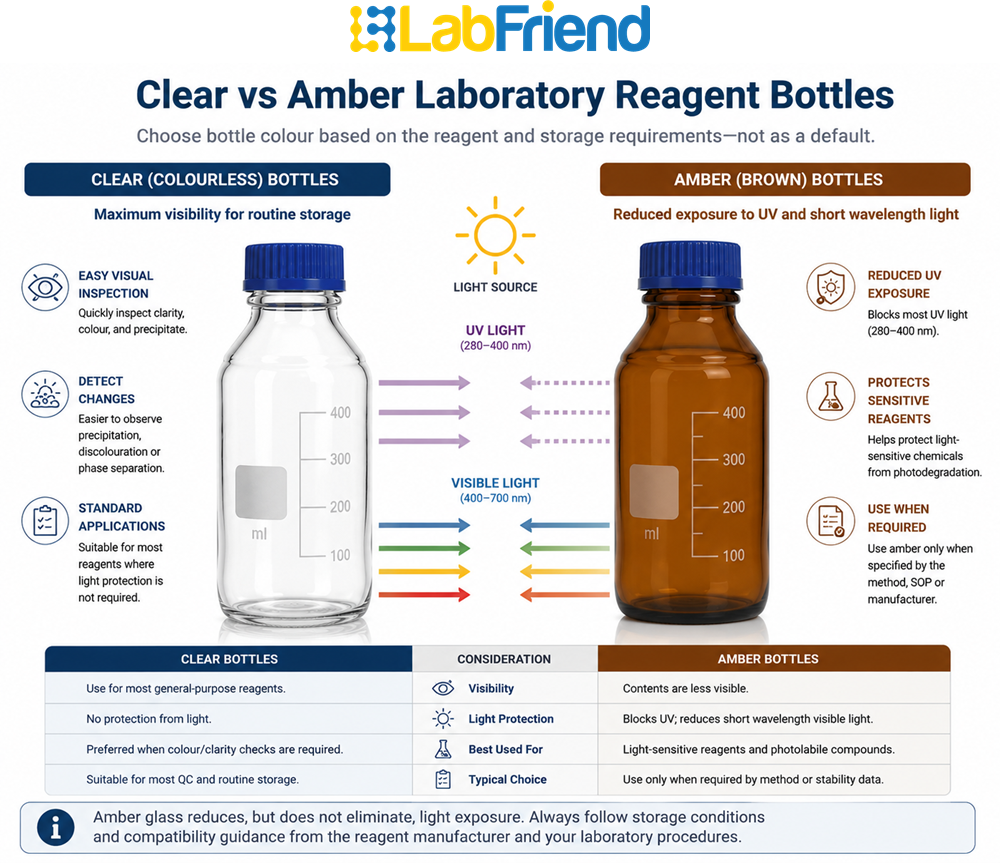
For QA/QC teams, the decision should be documented. If the bottle must be amber, say so in the specification. If clear bottles are acceptable, record that too. This helps procurement avoid uncontrolled substitution and prevents later uncertainty when a different bottle format is offered.
When the decision points towards reagent-specific storage, compare LabFriend UK’s laboratory reagent bottles by clear or amber format, material, volume and closure.
Choose the right mouth style and bottle format
Mouth style affects how the reagent bottle will be filled, poured, cleaned and used. It is easy to overlook, but it can make a significant difference to daily handling.
Narrow-mouth reagent bottles are often suitable for liquids where controlled pouring matters. They can help reduce spillage risk during routine handling and are commonly practical for prepared solutions or liquid reagents. If the workflow involves routine liquid storage and controlled pouring, LabFriend UK’s narrow-mouth laboratory bottles may be a useful category to review.
Wide-mouth bottles can be more practical where the workflow involves powders, solids, viscous materials, sample transfer or easier access for filling and emptying. They may also simplify cleaning where cleaning is part of the approved laboratory process. If filling access is more important than controlled pouring, browse LabFriend UK’s wide-mouth laboratory bottles and confirm material, closure and volume before ordering.
The correct format depends on the reagent and how users will handle it. A bottle may have the right material and volume but still be awkward or risky if the opening is wrong for the way the bottle is used.
Check cap, thread, liner and closure compatibility
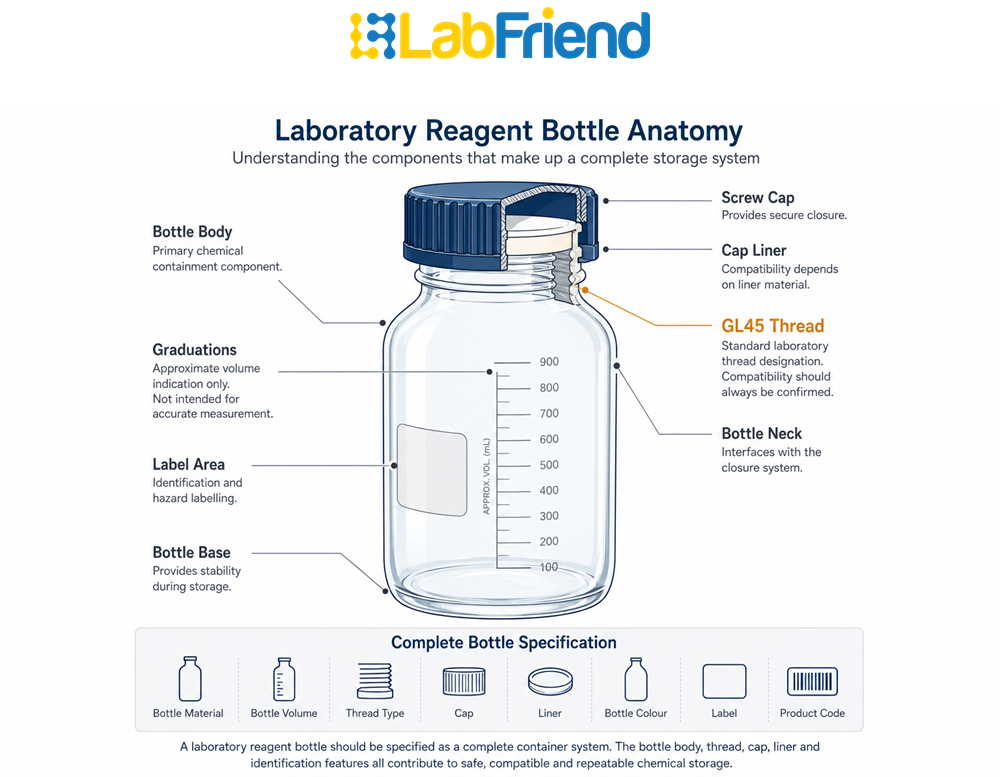
A reagent bottle should always be selected as a complete container system. The bottle body may be suitable while the cap, liner, seal or thread is not.
Cap liner materials also require compatibility assessment. Common liner materials such as PTFE-faced liners, polyethylene foam, pulp-backed liners or elastomer seals have different chemical resistance and vapour barrier properties. The liner should be selected for compatibility with both the liquid and its vapour.
This is especially important in chemical storage. The cap may be exposed to vapour, splashes or direct contact depending on fill level, handling and storage position. A liner or seal may influence leakage, evaporation, odour control or compatibility. Thread type matters because visually similar caps may not be interchangeable.
GL45 is a common laboratory bottle thread format, but the presence of a GL45 thread does not mean every GL45 cap, pouring ring, closure or accessory is suitable for every bottle or reagent. Compatibility should be checked at product level, especially where the bottle and cap are sourced separately.
For QA/QC purposes, the purchase specification should record whether the cap is supplied with the bottle, what thread is required, whether a liner is present, and whether replacement caps or compatible closures may be needed for repeat ordering.
Consider storage duration, temperature and evaporation risk
The same reagent may create different bottle requirements depending on how long it will be stored and under what conditions.
Short-term working solutions may have different practical requirements from long-term stock reagents. Room temperature storage may differ from refrigerated storage. A reagent used daily at the bench may need different handling features from one stored in a cabinet and opened rarely. Volatile, odorous or evaporation-sensitive contents may require closer attention to closure and seal suitability.
Temperature also matters. Do not assume a bottle is suitable for refrigerated, frozen, heated or autoclaved use unless the manufacturer specifically states that the complete bottle and closure system is suitable for those conditions. Thermal expansion, contraction, pressure changes and closure performance can affect storage integrity.
For chemical storage, sealed heating, gas-generating reactions, pressure or vacuum use should not be attempted with standard reagent bottles unless the specific bottle system is rated for that purpose. This point is important enough to state plainly: most routine reagent bottles are designed for storage and handling, not pressure applications.
Storage conditions beyond bottle selection
Bottle selection is only one part of safe chemical storage. Storage location, segregation of incompatible chemicals, secondary containment where required, temperature control and compliance with laboratory procedures remain essential. A chemically compatible bottle does not remove the need to follow the reagent manufacturer’s storage recommendations or applicable laboratory safety requirements.
Sterility, autoclavability and certification are separate checks
Sterility, autoclavability and certification are often confused, but they are separate product characteristics.
A bottle may be chemically suitable but not sterile. A sterile bottle may not be autoclavable. An autoclavable bottle may not be supplied sterile. A clean-looking bottle may not be certified, pre-cleaned, DNase-free, RNase-free or endotoxin-controlled.
For QA/QC laboratories, this distinction matters because different workflows require different evidence. Routine reagent storage may only require a suitable bottle and closure. Contamination-sensitive workflows may require sterile packaging or documented cleanliness. Trace analysis may require certified or pre-cleaned containers. Biological or molecular workflows may require specific purity claims that must be supported by documentation.
If sterility or contamination-sensitive handling is part of the requirement, review LabFriend UK’s sterile bottles and bags and confirm the product specification before ordering.
Do not transfer manufacturer labels without verification
When transferring reagents into secondary bottles, laboratory identification and hazard labelling should follow local procedures and applicable regulations. Original manufacturer labels should not be removed or reproduced in a way that creates uncertainty regarding the reagent identity, concentration or hazard information.
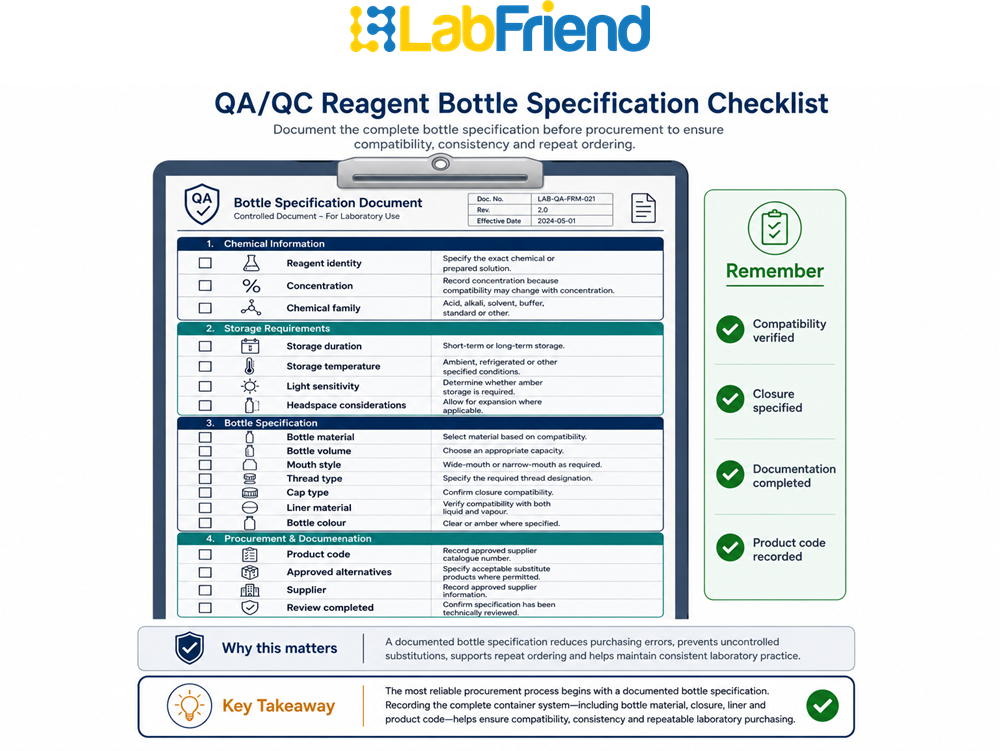
What QA/QC managers should specify before purchasing
A strong reagent bottle specification prevents avoidable ordering errors. It also helps procurement, stores teams and suppliers understand whether alternatives are acceptable.
Using a documented specification template helps ensure consistency between laboratory staff, procurement personnel and suppliers, reducing the risk of uncontrolled substitutions during repeat purchasing.
A useful specification should include:
|
Specification item |
Why it matters |
|
Reagent or chemical family |
Drives material and compatibility checks |
|
Concentration |
Compatibility can change with concentration |
|
Storage duration |
Short-term and long-term storage may differ |
|
Storage temperature |
Room temperature, refrigerated or other conditions affect suitability |
|
Light sensitivity |
Determines whether clear or amber format is required |
|
Bottle material |
Prevents uncontrolled glass/plastic substitution |
|
Volume |
Supports handling, headspace and reorder control |
|
Mouth style |
Affects pouring, filling and cleaning |
|
Thread / cap type |
Prevents closure mismatch |
|
Liner or seal |
May affect leakage, evaporation or compatibility |
|
Sterile / certified requirement |
Must be specified separately where needed |
|
Product code |
Supports accurate repeat ordering |
|
Approved alternatives |
Helps procurement substitute only where technically acceptable |
This type of specification is especially useful where the same bottle will be reordered. It allows the laboratory to move from ad hoc purchasing to controlled repeat supply.
Chemical compatibility should always be verified
Manufacturer compatibility tables should be treated as the primary reference when selecting bottle materials and closures. General compatibility charts provide useful guidance but cannot account for concentration, temperature, storage duration, mixtures or proprietary polymer formulations. Final selection should always be confirmed using the bottle manufacturer’s published compatibility information together with the reagent SDS and the laboratory risk assessment.
Common mistakes when buying reagent bottles
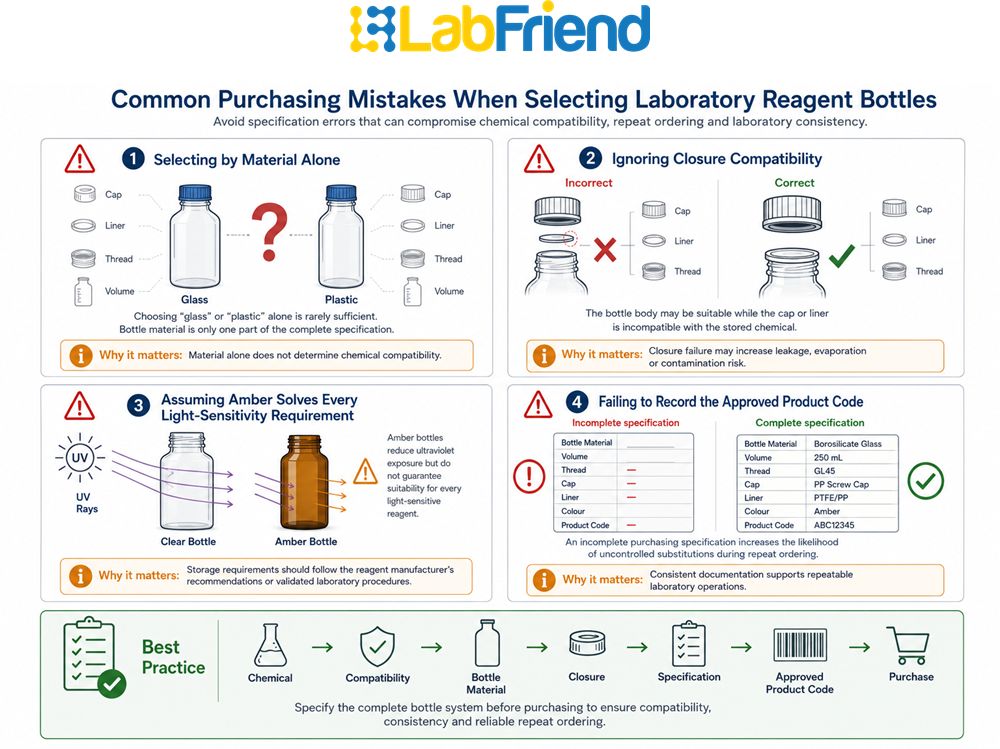
One common mistake is selecting by material alone. A request for “glass reagent bottles” or “plastic reagent bottles” may not be enough. The cap, liner, volume, mouth style, colour and storage conditions may be just as important.
Another mistake is assuming that amber glass automatically solves all light-sensitivity concerns. Amber glass may reduce light exposure where appropriate, but the method or reagent requirement should guide whether amber is sufficient.
A third mistake is ignoring the closure. Chemical storage is not only about the bottle body. The cap and liner can be the weak point if compatibility has not been considered.
QA/QC teams should also avoid assuming that bottle graduations are suitable for accurate measurement. Graduations on reagent bottles are generally useful for approximate indication only. Where accurate measurement is required, suitable volumetric equipment should be used.
Bottle graduations should not be used to prepare analytical standards, calibration solutions or volumetric dilutions because manufacturing tolerances for bottle graduations are not equivalent to those of calibrated volumetric glassware.
Finally, laboratories often fail to record the final approved product code. This creates repeat-order risk. If a suitable reagent bottle has been identified, the specification should be captured so that the same bottle, cap and pack size can be reordered consistently.
Relevant LabFriend category pathways
The most relevant commercial route for this article is LabFriend UK’s laboratory reagent bottles. This should be the first destination when the reader is ready to compare reagent bottle options by material, volume, cap/thread and clear or amber format.
For broader storage bottle decisions, use laboratory vessels. For controlled liquid handling, review narrow-mouth laboratory bottles. For powders, solids or easier filling, browse wide-mouth laboratory bottles. For contamination-sensitive workflows, review sterile bottles and bags.
These links should support the selection process rather than distract from it. The main action for this article remains clear: select the reagent bottle specification, then browse reagent bottle options.
FAQs
How do I select reagent bottles for chemical storage?
Start with the reagent identity, concentration, storage duration, temperature, light sensitivity and local laboratory procedure. Then choose the bottle material, volume, mouth style, cap, liner and clear or amber format that match the requirement. Compatibility should be checked against manufacturer guidance, SDS information, COSHH assessment and laboratory procedures.
How much empty space should be left in a reagent bottle?
The appropriate headspace depends on the chemical, storage conditions and laboratory procedure. Sufficient headspace should be left to accommodate thermal expansion where applicable, but excessive headspace may increase evaporation or oxidation for some reagents. Follow the reagent manufacturer’s recommendations and laboratory procedures.
Are glass reagent bottles better than plastic reagent bottles?
Glass is not automatically better than plastic, and plastic is not automatically better than glass. Borosilicate glass is commonly selected for many reagent storage workflows where visibility and glass properties are useful. Plastic may be suitable where lower breakage risk or lighter handling matters. The right choice depends on the reagent, concentration, storage conditions and product specification.
When should amber reagent bottles be used?
Amber reagent bottles are commonly selected where reduced light exposure is required. They may be suitable for light-sensitive reagents or prepared solutions, but amber glass does not automatically protect every substance. The method, reagent and storage conditions should determine whether amber glass is required.
What does GL45 mean on reagent bottles?
GL45 refers to a standardised laboratory screw-thread designation with an approximately 45 mm outside thread diameter used on many laboratory bottles. Although widely adopted, compatibility should always be confirmed because not every accessory is interchangeable between manufacturers.
Can reagent bottles be autoclaved?
Only where the specific bottle and closure system are specified as suitable for autoclaving. Do not assume autoclavability from the material alone. The cap, liner, closure and product documentation should all be checked.
Are sterile reagent bottles the same as autoclavable bottles?
No. Sterile means the product is supplied sterile where specified. Autoclavable means the product is suitable for autoclaving where specified. These are separate characteristics and should be confirmed independently.
Can reagent bottle graduations be used for accurate measurement?
Bottle graduations are generally useful for approximate volume indication only. Where accurate measurement is required, use suitable volumetric equipment.
What should QA/QC managers record for repeat ordering?
Record the bottle material, volume, mouth style, cap/thread, liner, clear or amber format, product code, pack size and any approved alternatives. This helps prevent uncontrolled substitutions and repeat-order errors.
Conclusion
Selecting laboratory reagent bottles for chemical storage is a controlled technical decision. The correct bottle depends on the reagent, concentration, storage duration, temperature, light sensitivity, closure system, documentation requirement and repeat-order need.
For QA/QC managers, the best approach is to define the storage requirement first, then select the bottle as a complete system. This reduces the risk of unsuitable substitutions, closure mismatch, poor repeat ordering and avoidable disruption.
Once the requirement is clear, compare LabFriend UK’s laboratory reagent bottles by material, volume, cap/thread and clear or amber format. For broader bottle and vessel selection, use LabFriend UK’s laboratory vessels category as the wider starting point.
Select reagent bottles for controlled chemical storage
Use this guide to define the reagent, compatibility, closure, volume and documentation requirement, then browse LabFriend UK’s laboratory reagent bottles to compare suitable options for routine laboratory supply.
Written by: Donal O’Sullivan, BSc, Co-Founder and Sales Director, LabFriend UK. Donal brings deep chemistry-led technical expertise across analytical chemistry, biochemistry, environmental monitoring, laboratory instrumentation, consumables and scientific product selection.
Reviewed by: Michael Anderson, MBA, Founder and Managing Director, LabFriend UK. Michael reviews LabFriend UK content for customer relevance, commercial accuracy, operational practicality and alignment with LabFriend UK’s laboratory supply model.
Browse Laboratory Reagent Bottles
Request an Instant Quote
Related Stories

Laboratory Bottle Selection for Lab Managers - Standardising Everyday Storage and Handling
Learn how UK lab managers can standardise laboratory bottle selection by material, volume, mouth style, closure, sterility, compatibility and reorder requirements to reduce stockouts and simplify repeat purchasing.

Glass vs Plastic Laboratory Bottles - Which Should UK Labs Choose
Glass vs Plastic Laboratory Bottles - Which Should UK Labs Choose

Laboratory Bottle Materials Explained - Borosilicate Glass - Amber Glass - HDPE - LDPE and PP
Laboratory Bottle Materials Explained - Borosilicate Glass - Amber Glass - HDPE - LDPE and PP

Glass vs Plastic Laboratory Bottles for Procurement Teams: Balancing Cost, Risk and Suitability
Glass vs Plastic Laboratory Bottles for Procurement Teams: Balancing Cost, Risk and Suitability