

Share :
Standard Laboratory Bottle Sizes for Lab Managers: Reducing Stockroom Complexity and Reorder Errors
Updated On 08/10/2026

By Donal O’Sullivan, BSc. Reviewed by Michael Anderson, MBA.
Quick answer
Lab managers should standardise laboratory bottle sizes where it reduces stockroom complexity, duplicated SKUs and reorder errors, but only where the bottle specification remains suitable for the workflow. A standard bottle range should define common sizes, bottle materials, mouth styles, cap/thread systems, labelling requirements, product codes, approved alternatives, reorder points and controlled exceptions.
Quick checklist:
– Define common sizes, materials, mouth styles and cap/thread systems for routine use
– Capture product codes, pack sizes and approved alternatives
– Set reorder points based on actual usage
– Record controlled exceptions (sterile, certified, amber, method-specific) separately
The aim is not to force every workflow into the same bottle. The aim is to reduce unnecessary variation while protecting technical suitability. Routine reagent storage, general liquid handling, powders, samples, bench use and stockroom storage may all need different standard options.
For broader bottle selection context, read LabFriend UK’s Laboratory Bottles: Selection Guide for UK Laboratories. Once the standard range is clear, lab managers can compare LabFriend UK’s laboratory vessels by bottle type, volume, mouth style, material and closure format.
Why bottle-size standardisation matters in busy laboratories
Many laboratories accumulate bottle variety gradually. One team orders a 250 ml reagent bottle for a specific buffer. Another orders a similar 500 ml bottle from a different supplier. A third group uses a wide-mouth version for powders. Over time, the stockroom holds several similar bottles, multiple cap types, uncertain product codes and no clear rule for what should be reordered.
This creates friction for lab managers. Stockroom space becomes harder to control. Users request bottles by description rather than product code. Procurement may order a similar-looking item that does not match the previous supply. Caps and closures become mixed between bottle families. Reorder points become unclear. Eventually, the laboratory carries too many bottle SKUs while still experiencing shortages of the sizes people actually use.
A standard bottle range helps by turning informal preferences into a controlled operating model. It gives scientists and technicians a reliable set of routine options. It gives procurement clearer product codes. It gives the stockroom a smaller and more manageable set of items to hold. Most importantly, it reduces avoidable mistakes without removing technical choice where choice is needed.
Standardisation should therefore be treated as a practical lab-management tool, not a cost-cutting exercise alone.
Standardisation should reduce complexity, not override suitability
The most important rule is that bottle standardisation must not override technical suitability. A simplified range is useful only if it still supports the work being done. Cost is also part of the picture: unit price, bulk-purchase discounts and total cost of ownership are worth weighing alongside technical suitability and stockroom efficiency when choosing the standard range.
A laboratory may be able to standardise routine 250 ml, 500 ml and 1 litre bottles for common storage tasks. It may also standardise a narrow-mouth liquid bottle range, a wide-mouth powder or sample range, and a square bottle range for storage efficiency. However, some workflows will still need exceptions. These may include sterile bottles, certified or pre-cleaned bottles, amber bottles, chemical-specific containers, method-specified bottles, freezer-suitable formats, autoclave-suitable systems or bottles with particular cap, liner or closure requirements. In this context, “certified” typically means a cleanliness or batch certificate of analysis (for example, trace-metal-free certification) rather than a regulatory or transport certification, so the specific certification required should be confirmed before ordering.
Lab managers should therefore avoid asking, “How few bottle sizes can we operate with?” A better question is:
Which bottle sizes can we standardise safely for routine workflows, and which applications need controlled exceptions?
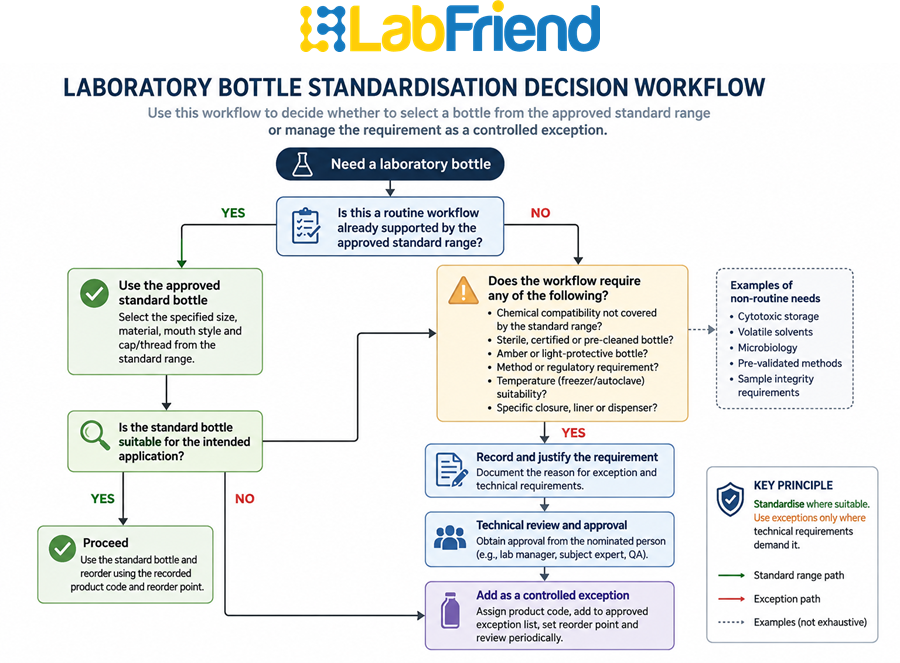
That approach protects trust with users. Scientists and technicians are more likely to follow a standard range if they see that it reflects real workflow needs rather than administrative simplification.
What a practical standard bottle range should include
A practical standard bottle range should be specific enough to prevent confusion but flexible enough to support legitimate technical differences.
At minimum, the standard range should define bottle volume, material, mouth style, cap/thread, pack size and product code. It should also identify where amber, sterile, certified, pre-cleaned, autoclavable or other documented bottle types are required. If replacement caps are ordered separately, the cap product codes should be recorded alongside the bottle product codes.
|
Standard range field |
Why it matters |
|
Bottle size |
Prevents unnecessary variation between similar volumes |
|
Bottle material |
Avoids uncontrolled substitution between glass, amber glass, HDPE (High-Density Polyethylene), PP (Polypropylene) or other materials — these differ in chemical resistance and temperature tolerance and should not be treated as interchangeable |
|
Mouth style |
Separates controlled pouring from filling, sample access and cleaning needs |
|
Cap/thread system |
Reduces mismatched caps and replacement-cap errors |
|
Product code |
Supports accurate repeat ordering |
|
Pack size |
Helps stockroom and procurement planning |
|
Approved alternatives |
Allows controlled substitution where technically acceptable |
|
Controlled exceptions |
Protects sterile, certified, chemical-specific or method-specific workflows |
|
Reorder point |
Reduces avoidable stockouts |
|
Internal owner or user group |
Clarifies who uses the bottle and why |
This is where standardisation becomes useful. It is not simply a list of sizes; it is a working reference that connects bottle choice, stockroom control and repeat ordering.
A simple standard bottle range model
The right standard range will vary by laboratory type, but many labs benefit from thinking in terms of routine use groups rather than isolated bottle sizes.
For example, a lab manager may define one range for routine reagent storage, another for controlled liquid pouring, another for powders and solids, and another for space-efficient stockroom storage. Each range can include a limited number of preferred sizes, while still allowing exceptions where the workflow requires something different.
|
Routine requirement |
Possible standard range logic |
Notes for lab managers |
|
Routine reagent storage |
Common reagent bottle sizes such as 250 ml, 500 ml and 1 L where suitable |
Confirm material, clear/amber format, cap/thread and chemical suitability |
|
Prepared solutions and buffers |
Sizes matched to typical batch volumes and consumption rate |
Avoid oversizing where storage duration or handling becomes an issue |
|
Controlled liquid pouring |
Narrow-mouth options in common volumes |
Useful where pouring control matters more than filling access |
|
Powders, solids and samples |
Wide-mouth options in selected volumes |
Useful where scooping, filling, retrieval or cleaning matters |
|
Stockroom and fridge storage |
Square bottle options where storage footprint is important |
Check rack fit, labelling, access and closure suitability |
|
Special workflows |
Controlled exceptions outside the standard range |
Use where sterile, certified, amber, chemical-specific or method-specified bottles are required |
This model is deliberately flexible. It gives lab managers a way to reduce complexity without pretending that one range fits every application.
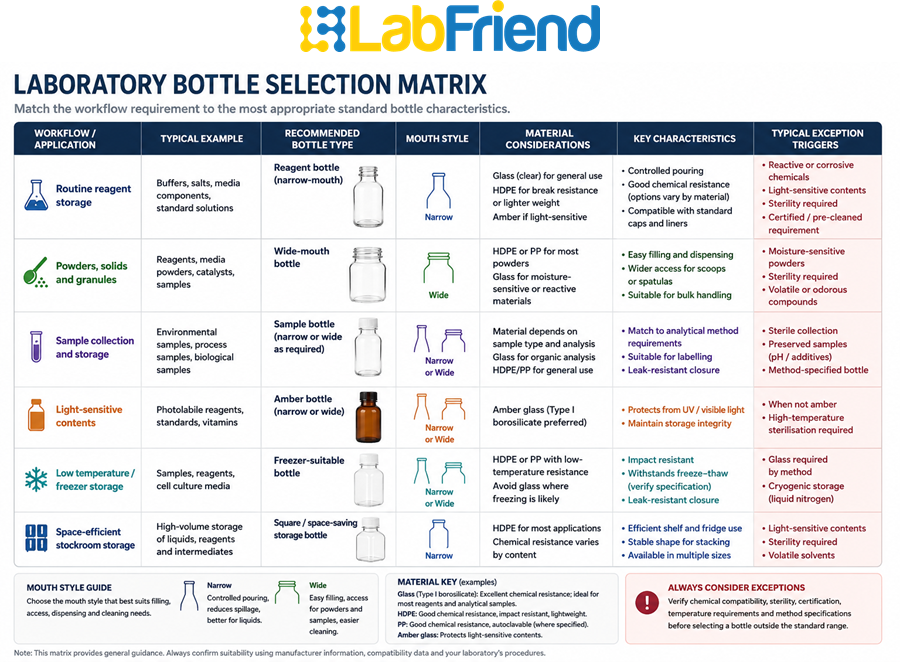
Once routine ranges are drafted, it is worth comparing LabFriend UK’s laboratory reagent bottles, narrow-mouth laboratory bottles, wide-mouth laboratory bottles and square laboratory bottles are worth reviewing at this stage.
How to handle exceptions to the standard range
A standard range should make routine purchasing easier, but it should not block legitimate technical requirements. Exceptions are not a failure of standardisation. They are part of a controlled system.
The key is to define which exceptions are allowed and how they are approved. A bottle should sit outside the standard range where the application needs a specific material, light protection, sterility, certification, cleaning status, cap/liner, method requirement, storage condition or compatibility check.
Examples include amber reagent bottles for light-sensitive contents, certified or pre-cleaned bottles for contamination-sensitive work, sterile bottles for microbiology or biological workflows, and chemical-specific bottle systems where compatibility or closure requirements are critical. Amber glass blocks UV and much visible light but does not guarantee full-spectrum opacity, so highly photosensitive materials may need additional protection, such as foil wrapping, beyond amber glass alone.
Lab managers should make exceptions visible rather than informal. If a team needs a non-standard bottle, the reason should be recorded. If the same exception is used repeatedly, it may deserve its own approved product code and reorder point. That prevents the exception from becoming a recurring emergency order.
|
Exception trigger |
Suggested action |
|
Chemical compatibility requirement |
Confirm bottle, cap and liner suitability before approval |
|
Sterile or certified requirement |
Keep separate from routine bottle stock |
|
Amber or light-protection requirement |
Do not substitute clear bottles without review |
|
Method-specified bottle |
Maintain exact specification unless method owner approves change |
|
Autoclave or temperature exposure |
Confirm bottle and closure suitability from documentation, including the manufacturer’s rated temperature (autoclave cycles typically run at 121°C) and the risk of cracking from liquid expansion if bottles are frozen while full |
|
Non-standard cap or liner |
Capture bottle and cap product codes together |
|
Repeated exception demand |
Consider adding it to the approved range with its own reorder point |
The practical principle is simple: standardise routine items, control exceptions and record the reason for both.
Cap/thread and replacement-cap control
Bottle-size standardisation often fails because cap and thread details are not controlled. A lab may standardise the bottle volume but still allow multiple cap types, liners or thread systems into stock. That creates avoidable mismatch.
A standard range should therefore include cap/thread information. If bottles are supplied complete with caps, record that clearly. If replacement caps are ordered separately, record the cap product code and any liner or seal details. Where GL (thread standard) formats are relevant, the thread reference should be captured, but it should not be treated as a full compatibility guarantee. GL threads (for example GL25, GL32 or GL45) are a DIN-standardised thread designation used on most laboratory glass bottles; a matching GL number confirms thread diameter only, not liner material, seal composition or full cap compatibility across manufacturers.
The cap, liner and closure system can affect leakage, evaporation, chemical exposure, cleaning, storage and repeat use. Liner material is itself part of that decision: PTFE-faced liners generally offer greater resistance to solvents and aggressive chemicals than standard liners, so liner choice should be treated as a technical specification, not just a detail to record. Lab managers do not need to turn every cap decision into a complex technical review, but they should prevent uncontrolled mixing between bottle families.
A good stockroom rule is:
A bottle size is not fully standardised until the matching cap and closure requirement is also standardised.
This is especially important in shared labs where bottles and caps may be separated during washing, reuse or storage.
Stockroom layout, labelling and storage footprint
Bottle-size standardisation should make the stockroom easier to run. That means thinking beyond the product code and considering how bottles are stored, labelled and accessed.
Large bottles may reduce the number of units stocked, but they can consume shelf height, create heavier handling and make fridge or cabinet organisation harder. Smaller bottles may be easier to distribute but increase SKU count or reorder frequency. Square bottles may improve storage density and label visibility, but they still need to be checked for material, closure and workflow suitability.
Labelling is also part of the decision. Standard bottle sizes should allow labels to be applied clearly and read easily in normal storage conditions. If a bottle is too small for the required label information, traceability can suffer. If labels are difficult to see in a fridge, cupboard or stockroom bin, users may select the wrong item.
For stockroom planning, lab managers should consider:
|
Stockroom factor |
Why it matters |
|
Shelf height and depth |
Determines whether preferred sizes fit practical storage locations |
|
Fridge or freezer space |
May favour smaller or square formats where technically suitable |
|
Label visibility |
Helps users identify the right bottle quickly |
|
Bin or rack compatibility |
Reduces mixed stock and picking errors |
|
Handling weight |
Affects safe movement and day-to-day usability |
|
Pack size |
Influences storage footprint and reorder quantity |
|
Separation of exceptions |
Prevents routine bottles being confused with specialised formats |
Where storage density and labelling visibility are important, square laboratory bottles may be useful to compare after the workflow requirement is clear.
Reorder points, product-code capture and repeat ordering
A standard range becomes more valuable when it is connected to reorder control. Without reorder points, the laboratory may still experience stockouts even if the number of bottle SKUs has been reduced.
For each standard bottle, the lab manager should define a product code, pack size, typical usage rate, reorder point and preferred supplier route. The reorder point should reflect actual usage, not assumptions. A practical starting point is to calculate the reorder point as average usage rate multiplied by supplier lead time, plus a safety-stock margin for demand variability. A bottle used daily by multiple teams needs different stock control from a bottle used occasionally for a specific workflow.
Product-code capture is particularly important. Users may describe a bottle as “the 500 ml reagent bottle”, but procurement needs the exact product code, material, cap/thread and pack size. If the same bottle is supplied in multiple formats or with different closures, those distinctions should be recorded.
A practical standard bottle record might include:
|
Record field |
Recommended detail |
|
Standard bottle name |
Internal name used by the lab |
|
Product code |
Exact product code for repeat ordering |
|
Bottle volume |
Nominal size and expected working use |
|
Material |
Glass, amber glass, HDPE, PP or other |
|
Mouth style |
Narrow-mouth, wide-mouth, square or other |
|
Cap/thread |
Thread type, supplied cap or replacement cap code |
|
Pack size |
Ordering and stockroom unit |
|
Standard use |
Routine reagent storage, samples, powders, etc. |
|
Approved alternatives |
Only where technically reviewed |
|
Reorder point |
Minimum stock level or reorder trigger |
|
Owner |
Team, lab area or responsible person |
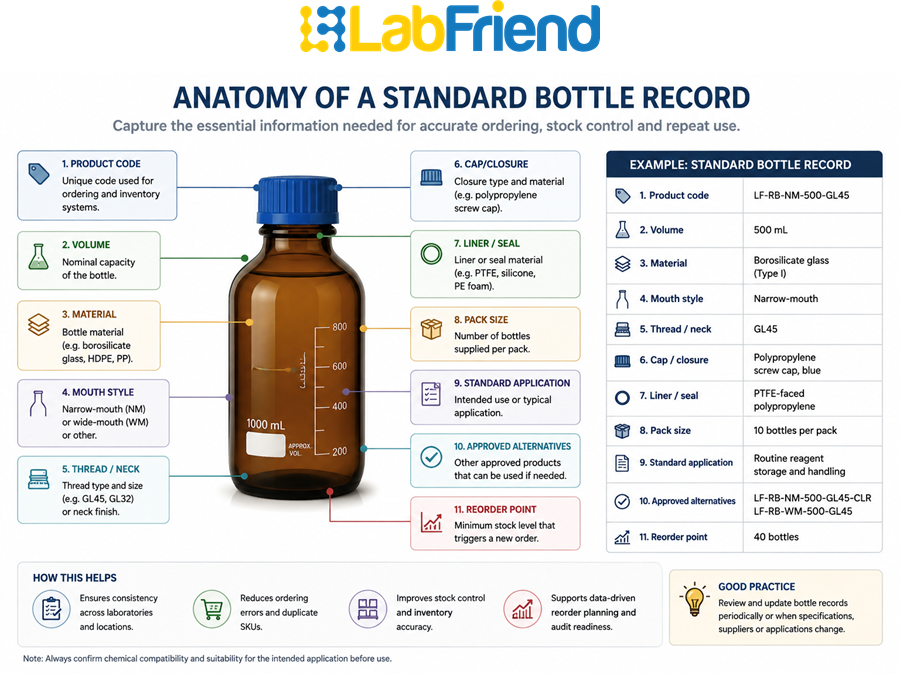
This record helps lab managers reduce repeated clarification, improves procurement accuracy and makes repeat supply more predictable.
Common mistakes when standardising bottle sizes
One common mistake is reducing too aggressively. A lab may remove useful variation and then force users into bottles that are not suitable for the work. This creates resistance and may lead teams to bypass the standard range.
Another mistake is standardising volume but ignoring mouth style. A 500 ml narrow-mouth bottle and a 500 ml wide-mouth bottle are not interchangeable in every workflow. Filling, pouring, cleaning and sample retrieval can all differ.
A third mistake is ignoring caps. If the lab standardises bottle sizes but does not standardise cap/thread and replacement-cap details, mismatch problems will continue.
A fourth mistake is treating stockroom efficiency as the only objective. Storage density is important, but it should not override chemical compatibility, sterility, certification, cleaning status, light protection, temperature suitability or method requirements. Sustainability is worth weighing too — recyclability of glass versus plastic, opportunities to reduce single-use plastic, and supplier recycling or take-back schemes can all inform material choice within the standard range.
A further mistake is failing to communicate the new range to the people who will use it. Even a well-designed standard range can fail if lab users are not told about the updated product codes, so a short rollout communication or briefing is worth building into the process.
The final mistake is failing to review the range after it is introduced. Usage changes, teams change, workflows change and preferred sizes may need adjustment. A standard range should be controlled, but not frozen forever. A practical approach is to review the range on a set cadence, for example annually, or sooner if workflows or teams change materially.
What this article does not solve
This article helps lab managers define a practical standard range of laboratory bottle sizes. It does not confirm that a specific bottle is chemically compatible, sterile, certified, pre-cleaned, autoclavable, freezer-suitable, pressure-rated, vacuum-rated or method-approved.
Those checks must come from product documentation, manufacturer information, SDS (Safety Data Sheet), COSHH (Control of Substances Hazardous to Health) assessment, method requirements and local procedures, typically coordinated with the lab’s EHS/safety officer, the method owner, or the supplier’s technical support team.
Standardisation should also not be used to replace a technical review. If a workflow requires a specific bottle material, cap system, closure, documentation status or storage condition, that requirement should be preserved as a controlled exception or added to the approved range with the correct specification.
What to check before setting the standard range
Before introducing a standard laboratory bottle range, lab managers should review actual usage rather than relying only on what is already in the stockroom. Existing stock may reflect historical purchasing habits rather than current workflow needs.
|
Check |
Question for the lab manager |
|
Routine applications |
Which bottle uses happen every week or month? |
|
Current SKUs |
How many similar bottle sizes and formats are currently being ordered? |
|
High-use sizes |
Which bottle sizes are genuinely used most often? |
|
Problem items |
Which bottles or caps create reorder errors or user complaints? |
|
Technical requirements |
Which workflows need material, closure, sterile, certified or method-specific control? |
|
Mouth style |
Which workflows need narrow-mouth, wide-mouth or square formats? |
|
Storage footprint |
Which bottle sizes fit stockroom, fridge, freezer, shelf and rack space? |
|
Cap/thread control |
Are replacement caps and liners defined? |
|
Reorder points |
When should each standard bottle be reordered? |
|
Exceptions |
Which items must remain outside the standard routine range? |
This checklist should lead to a practical working range, not a rigid rulebook. The aim is to make routine supply easier while protecting the technical exceptions that matter. Use the table below as a practical, working checklist to run through with your team.
Where to compare bottle options once the standard range is defined
Once the standard range has been defined, lab managers can move from planning to product comparison.
For a broad review of bottle and vessel options, start with LabFriend UK’s laboratory vessels. If the standard range includes routine reagent storage, compare laboratory reagent bottles by common volume, material, cap/thread and clear or amber format.
Where controlled liquid pouring is part of the standard range, start with narrow-mouth laboratory bottles. Where the range needs powders, solids, samples, filling access or easier cleaning, review wide-mouth laboratory bottles. Where stockroom density, labelling visibility or fridge and cupboard organisation matter, compare square laboratory bottles.
If the standard range involves several bottle types, exceptions or replacement-cap requirements, contact LabFriend UK for specification-led support before requesting a quote. The correct sequence is: define the routine range, protect technical exceptions, compare suitable options and then request support or pricing.
FAQs
How should lab managers standardise laboratory bottle sizes?
Lab managers should identify routine bottle uses, define preferred sizes and formats, capture product codes, standardise cap/thread details, set reorder points and document controlled exceptions. Standardisation should reduce unnecessary variation without overriding technical suitability.
What standard laboratory bottle sizes should a lab keep?
There is no universal set of standard sizes. Many labs use common sizes such as 250 ml, 500 ml and 1 litre for routine workflows, but the correct range depends on the lab’s applications, working volumes, storage space, handling needs, materials and closure requirements. Quoted sizes are nominal; actual brimful capacity is typically larger, which is worth checking when matching bottles to specific batch volumes.
How can labs reduce bottle SKUs?
Labs can reduce bottle SKUs by identifying duplicate or near-duplicate products, consolidating routine bottle sizes, standardising product codes, controlling replacement caps and separating routine stock from technical exceptions.
How can lab managers reduce bottle reorder errors?
Reorder errors can be reduced by recording exact product codes, pack sizes, bottle materials, cap/thread details, replacement-cap codes, approved alternatives and reorder points. Users should request standard items by product code, not description alone.
When should a bottle be excluded from a standard range?
A bottle should be excluded where the workflow requires a specific material, sterile status, certification, pre-cleaning, amber format, cap/liner, chemical compatibility, temperature suitability or method-defined specification.
Should lab managers standardise narrow-mouth and wide-mouth bottles?
Yes, where both formats are used routinely. Narrow-mouth bottles may support controlled pouring, while wide-mouth bottles may be better for powders, solids, samples, filling access or cleaning. They should not be treated as interchangeable by volume alone.
How do cap/thread mismatches happen in laboratory stockrooms?
They happen when bottles and caps are ordered separately, product codes are missing, similar bottle families are mixed, or thread type is treated as a full compatibility guarantee. Cap material, liner, seal and manufacturer specification may all matter.
How should labs set reorder points for bottles?
Reorder points should be based on actual usage, pack size, lead-time expectations, minimum stock levels and the importance of the workflow. High-use routine bottles should have clearer reorder triggers than occasional exception items.
Are fewer bottle SKUs always better?
No. Fewer SKUs can improve stockroom control, but reducing too far can create unsuitable substitutions. Technical suitability, documentation requirements and workflow needs should take priority over SKU reduction.
Can square bottles improve stockroom organisation?
They can help in some storage layouts because they may improve density and label visibility, but they are not automatically suitable for every application. Material, closure, handling and workflow suitability still need to be checked.
Conclusion
Standard laboratory bottle sizes can make a busy laboratory easier to manage. A well-designed standard range reduces duplicated SKUs, avoids repeated clarification, improves stockroom organisation and helps prevent reorder errors.
The best standard range is not the smallest possible range. It is the range that supports routine work while protecting technical exceptions. Lab managers should define common bottle sizes, mouth styles, materials, cap/thread systems, product codes, reorder points and approved alternatives. They should also keep separate controls for sterile, certified, chemical-specific, temperature-sensitive or method-specified workflows.
With the range defined, lab managers can turn to LabFriend UK’s laboratory vessels, laboratory reagent bottles, narrow-mouth bottles, wide-mouth bottles or square bottles, matching the format to the standard range being supported.
Request support with standard laboratory bottle sizes
Define the routine bottle range first: common sizes, materials, mouth styles, cap/thread systems, product codes, approved alternatives, reorder points and controlled exceptions. Then compare suitable LabFriend UK bottle options or contact LabFriend UK for support building a standard range and quote request.
Written by: Donal O’Sullivan, BSc, Co-Founder and Sales Director, LabFriend UK. Donal brings deep chemistry-led technical expertise across analytical chemistry, biochemistry, environmental monitoring, laboratory instrumentation, consumables and scientific product selection.
Reviewed by: Michael Anderson, MBA, Founder and Managing Director, LabFriend UK. Michael reviews LabFriend UK content for customer relevance, commercial accuracy, operational practicality and alignment with LabFriend UK’s laboratory supply model.
Related Stories

Autoclavable Laboratory Bottles - What to Check Before Buying
Autoclavable Laboratory Bottles - What to Check Before Buying

Narrow-Mouth vs Wide-Mouth Bottles for Lab Managers - Reducing Handling Errors and Stock Complexity
Narrow-Mouth vs Wide-Mouth Bottles for Lab Managers - Reducing Handling Errors and Stock Complexity

Narrow-Mouth vs Wide-Mouth Laboratory Bottles: Which Should You Choose?
Narrow-Mouth vs Wide-Mouth Laboratory Bottles: Which Should You Choose?

Amber vs Clear Reagent Bottles for Procurement Teams - Specification and Substitution Checks
Amber vs Clear Reagent Bottles for Procurement Teams - Specification and Substitution Checks